


Monday, December 16, 2013
Snow Cream Sundaes with Jacob!
My grandson Jacob makes his "debut" over at the Inspiration Cafe today. He's going to show you how easy it is to make snowcream Sundaes. He fancies himself a food critic these days.
You can check it out by clicking on the picture below!
Thursday, December 12, 2013
LIVING IVY CHRISTMAS WREATH
I promised myself I wouldn't make my life any crazier this holiday season by decorating this house while trying to renovate the other. However, with company coming this weekend, I felt like I needed to make things just a bit festive so they wouldn't think I was a complete scrooge. Time to put creativity to the test, using what is at hand. In this case it was an ivy plant I had in my kitchen. Looked like a perfect candidate for a Christmas wreath to me.
 This went together so fast and was so easy! You could make this out of any trailing plant. You just need a couple of things you probably already have.

All I did was shove a dowel rod into a twig wreath form and secure it with a generous amount of hot glue. After it was set, I just broke off the dowel rod to the length I needed and shoved the whole thing in the center of the plant.
 At this point I separated the ivy vines and began winding them around the wreath form. Every now and then I secured it with a few "twist ties" I made from this twiggy looking paper-wrapped wire stuff, which I loved because it blends right in. (Floral wire would work fine too.)
 Add a pretty bow and you have a lovely living wreath that won't dry out and lose needles.
 Add a wooden deer with a festive ribbon around his neck for that extra holiday decor cuteness factor.
 How easy was that?! After the holidays, I'll just remove the bow and leave the wreath form in for a pretty ivy topiary. (I suspect it will make a grand reappearance sometime around Valentines Day.) Not bad for just using stuff I had. Zero dollars......perfect for my holiday budget!
I still have one or two more easy holiday decor magic tricks up my sleeve.


Hot Glue Gun
Twig Wreath or any wreath form
Dowel Rod or stick
All I did was shove a dowel rod into a twig wreath form and secure it with a generous amount of hot glue. After it was set, I just broke off the dowel rod to the length I needed and shoved the whole thing in the center of the plant.


I still have one or two more easy holiday decor magic tricks up my sleeve.
Friday, December 6, 2013
WE BOUGHT A HOUSE!
I could have titled this a lot of things, like "We Bought a Major Project" or "Blogging Has Given Me Waaaay Too Much Confidence". Maybe "I've Lost My Freakin Mind" would be more appropriate. Probably, "Where I Am and Where I'm Not" would be the best title.
Really...nothing says crazy like starting a major renovation project at Christmas, right? Did I mention that my wonderful friends from England are coming in less than 2 weeks with their 3 teenagers?? Uh-huh.
The low-down is this....we had a house all picked out and were waiting for the sale of our land to close (next week). A house that was perfect, within our price range and didn't even need a drop of paint or anything. One night, just a little over 2 weeks ago, at 7:15p.m.,Sam is sitting in front of the computer and I hear these words..."Danni, I think you should come take a look at this." Okay...I felt like the girl in the scary movie who hears the noise downstairs and knows she shouldn't look, but goes anyway. I walked slowly, but yes...I went. This is what I saw. I did not love it.
Of course it was a smokin deal....a 4bedroom house, 2 car garage, family room, fenced back yard, brand new roof, 1 yr. old appliances...for $74,000.00. Smokin! But...it was a fixer upper. It needed a lot of work. He said, "This house will be gone tomorrow. We should go look at it first thing in the morning." My stomach rolled, but I knew he was right. My husband is an awesome, full-time realtor with a brokers license, he knows his stuff.
We looked at it at 8a.m., made an offer of $68,000 at 10a.m., it was accepted at noon. We had an inspection on Monday and based on the inspection, and a 2 week close, we scored this lovely beast for $64,000. We closed Wednesday. Yep...2 weeks start to finish and this is where I'll be living in February. I have a lot to do in a very short time.
I will not be posting on my blog regulary for a little while. Unlike my friend Suzan at Simply Vintageous.....by Suzan, who is awesome, and who can live AND blog in the middle of renovating her house, no... that will not be me.
I will not be reading and commenting on blogs, because I have just a little over 2 months to have this house move-in ready and I will need almost every minute of it. I will miss you. I will miss reading your blogs terribly. (It's my favorite morning thing to do!) I will most likely not have time to even reply to comments, which I will also miss terribly. If I have time at all to be on the computer, I will be scouring pinterest and DIY sites for all of the cost-cutting ideas I can find. (Like right now pinterest has made me feel like I can build my own range vent hood as well as add a master bath!) I will be gutting one bathroom and adding 2. I will prime and paint every room and ceiling and put in all new flooring. I will gut this kitchen and use those ugly black 1 year old appliances in a fabulous way. And something I'm actually very excited about...I will try a new style in the family room, something I've always adored, but feared...Danish Modern.
I do have one or two Christmas craft projects that I will post next week, and then I will be AWOL most of the time. I will leave you with these pictures of my new "Money Pit".


 My life is about to be insane and I will miss you all, but...I'll be back from time to time with updates.
Have a lovely Christmas and a Happy New Year!
Really...nothing says crazy like starting a major renovation project at Christmas, right? Did I mention that my wonderful friends from England are coming in less than 2 weeks with their 3 teenagers?? Uh-huh.
The low-down is this....we had a house all picked out and were waiting for the sale of our land to close (next week). A house that was perfect, within our price range and didn't even need a drop of paint or anything. One night, just a little over 2 weeks ago, at 7:15p.m.,Sam is sitting in front of the computer and I hear these words..."Danni, I think you should come take a look at this." Okay...I felt like the girl in the scary movie who hears the noise downstairs and knows she shouldn't look, but goes anyway. I walked slowly, but yes...I went. This is what I saw. I did not love it.
 |
| (More ugly pictures at the end of this post.) |
We looked at it at 8a.m., made an offer of $68,000 at 10a.m., it was accepted at noon. We had an inspection on Monday and based on the inspection, and a 2 week close, we scored this lovely beast for $64,000. We closed Wednesday. Yep...2 weeks start to finish and this is where I'll be living in February. I have a lot to do in a very short time.
I will not be posting on my blog regulary for a little while. Unlike my friend Suzan at Simply Vintageous.....by Suzan, who is awesome, and who can live AND blog in the middle of renovating her house, no... that will not be me.
I will not be reading and commenting on blogs, because I have just a little over 2 months to have this house move-in ready and I will need almost every minute of it. I will miss you. I will miss reading your blogs terribly. (It's my favorite morning thing to do!) I will most likely not have time to even reply to comments, which I will also miss terribly. If I have time at all to be on the computer, I will be scouring pinterest and DIY sites for all of the cost-cutting ideas I can find. (Like right now pinterest has made me feel like I can build my own range vent hood as well as add a master bath!) I will be gutting one bathroom and adding 2. I will prime and paint every room and ceiling and put in all new flooring. I will gut this kitchen and use those ugly black 1 year old appliances in a fabulous way. And something I'm actually very excited about...I will try a new style in the family room, something I've always adored, but feared...Danish Modern.
I do have one or two Christmas craft projects that I will post next week, and then I will be AWOL most of the time. I will leave you with these pictures of my new "Money Pit".


Have a lovely Christmas and a Happy New Year!
Saturday, November 30, 2013
WINE MULLS....THE PERFECT HOME MADE GIFT!
Mulled wine is truly a unique holiday wine drinking experience and wine mulls are probably my favorite thing to make and give at Christmas. These are so easy to make and one mull with a bottle of red wine, makes a perfectly elegant and inexpensive gift.

I have been known to keep a basket of them by the front door to give to holiday visitors and party guests. So lovely, don't you think?
 Guess what? If you have friends who don't drink alcohol, these are perfectly wonderful in warm apple cider as well.
The following recipe makes just two mulls, but it is as easy to make 10 or 12. Just multiply the ingredients accordingly.
Wine Mulls
1 med. orange
1/2 C. firmly packed light brown sugar
1tsp. nutmeg
1 tsp. allspice
2 (2") cinnamon sticks
12 whole cloves
Preheat oven to 200 degrees. Cut orange in half lengthwise and scoop out pulp. Place a ball of aluminum foil in each half. (This helps distribute the heat evenly as well as helps the orange half keep its circular shape as it's drying.) Place halves on baking sheet and dry in oven 4-5 hours. Remove foil and dry an additional 15 minutes.
In a small bowl, combine brown sugar, allspice and nutmeg. Pack half of the mixture into each orange half. Decorate tops with cinnamon stick placed down the center (press into brown sugar a bit) and place 3 coves on each side. Wrap tightly in plastic wrap, tie top with a pretty ribbon and include the following Mulled Wine recipe.
Mulled Wine
1 wine mull
1 (750 ml.) bottle of red wine
Pour wine into pan. Unwrap mull and drop into pan with wine. Heat through. (Do not boil.)
I made this tag, hole punched it and tied it to the top of the mull wrap with pretty ribbon.
 A few notes on making these wine mulls.....
I juiced my orange halves and then scooped out the pulp.
(Bonus! Fresh squeezed orange juice to drink while you are making these. I recommend adding a little vodka to that juice!)
The orange halves shrink a lot and get hard and dark orange when drying out. Don't freak out.
Dry time depends on the size of the oranges. I used medium sized oranges and it took about 4 hours.
I made the aluminum foil balls big enough to fill up about half the space in side the orange.
I used a Dremel to cut my cinnamon sticks to make them fit perfectly inside the orange half.
 Sharing at:
Twigg Studios Sunday Show Off
Boogieboard Cottage - Masterpiece Monday
It All Started With Paint - Super Saturday Linky Party
Call Me PMc - Marvelous Mondays
Kitchen Table Art - Making Monday
The Dedicated House - Make it Pretty Monday
Cedar Hill Farmhouse - The Scoop
Knick of Time - Vintage Inspiration Party
Kathe With an E - You're Gonna Love It Tuesday

I have been known to keep a basket of them by the front door to give to holiday visitors and party guests. So lovely, don't you think?

The following recipe makes just two mulls, but it is as easy to make 10 or 12. Just multiply the ingredients accordingly.
Wine Mulls
1 med. orange
1/2 C. firmly packed light brown sugar
1tsp. nutmeg
1 tsp. allspice
2 (2") cinnamon sticks
12 whole cloves
Preheat oven to 200 degrees. Cut orange in half lengthwise and scoop out pulp. Place a ball of aluminum foil in each half. (This helps distribute the heat evenly as well as helps the orange half keep its circular shape as it's drying.) Place halves on baking sheet and dry in oven 4-5 hours. Remove foil and dry an additional 15 minutes.
In a small bowl, combine brown sugar, allspice and nutmeg. Pack half of the mixture into each orange half. Decorate tops with cinnamon stick placed down the center (press into brown sugar a bit) and place 3 coves on each side. Wrap tightly in plastic wrap, tie top with a pretty ribbon and include the following Mulled Wine recipe.
Mulled Wine
1 wine mull
1 (750 ml.) bottle of red wine
Pour wine into pan. Unwrap mull and drop into pan with wine. Heat through. (Do not boil.)
I made this tag, hole punched it and tied it to the top of the mull wrap with pretty ribbon.

I juiced my orange halves and then scooped out the pulp.
(Bonus! Fresh squeezed orange juice to drink while you are making these. I recommend adding a little vodka to that juice!)
The orange halves shrink a lot and get hard and dark orange when drying out. Don't freak out.
Dry time depends on the size of the oranges. I used medium sized oranges and it took about 4 hours.
I made the aluminum foil balls big enough to fill up about half the space in side the orange.
I used a Dremel to cut my cinnamon sticks to make them fit perfectly inside the orange half.

Twigg Studios Sunday Show Off
Boogieboard Cottage - Masterpiece Monday
It All Started With Paint - Super Saturday Linky Party
Call Me PMc - Marvelous Mondays
Kitchen Table Art - Making Monday
The Dedicated House - Make it Pretty Monday
Cedar Hill Farmhouse - The Scoop
Knick of Time - Vintage Inspiration Party
Kathe With an E - You're Gonna Love It Tuesday
Tuesday, November 19, 2013
HAD TO HAVE IT: 1920s Art Deco Light Cover
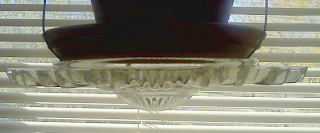
I see so many wonderful posts with terrific finds and my first thought is, "Oh I never find cool stuff like that!" But, that's not true. I have a lot of fun finds that were found long ago, before blogging. Today I'm going to share one of them. I found this Art Deco light cover in a flea market for $2. I totally had to have it.
 I'm currently using it as a plant holder because it has 3 screw holes in it and it seemed perfect for that purpose.
 Here's a funny story....When I first bought it, I really had no plan for it but just liked the look of it. I loved the way it caught the light, so bright, clear and icy looking. I just set it on a windowsill and admired it. At the time, we were living in the upstairs of a two story home we purchased as future rental property. (We lived upstairs while we renovated the first floor.) One day my door bell rang. I was a little surprised, I didn't know anyone in that town. It was the neighbor who lived a few houses behind us. She wanted to know what I had in that window!! She had been admiring it for several days, but it was too far away for her to figure out what it was. Funny...but a little strange to think someone had been looking in my window for a few days.
I found this one on etsy for $35.
 I found this one on ebay for $28.
 I think I'll just keep my eye out in the flea markets for another one. In the meantime, this one will remain a plant holder. (Although, while writing this post, I did have an idea....you know how I am!)
 Speaking of fun finds, my friend Lorraine from Miss Flibbertigibbet is showing some great makeovers of some of her own fun finds at the Inspiration Cafe today. You might want to go over and check it out! Just click on the image below....

Linking up:
Super Saturday Link Party


I found this one on etsy for $35.


Linking up:
Super Saturday Link Party
Tuesday, November 12, 2013
TUULA'S IN THE HOUSE!
I am so happy to tell you that Tuula from The Thrifty Rebel is in the house over at the Inspiration Cafe today! If you know Tuula, then you know she's made something fabulous and she says this is her favorite project to date! If you don't know Tuula...well where have you been?! LOL!
Here's a peak at what she's got going on for our Junkin Jewels series...you won't believe it!
 Want to see what she made?? Just click on the button below, I'll take you there!

Here's a peak at what she's got going on for our Junkin Jewels series...you won't believe it!
Monday, November 11, 2013
PRECIOUS FINGERPRINTS
Do you know Megan at Our Pinteresting Family? She just had the most beautiful twin boys! I can't imagine having twins. (I get exhausted just having my Grandson for a few days.) While Megan's resting up and enjoying Ty and Davis, I'm doing a guest post over at her blog today. In honor of Megan being doubly blessed, I'll be sharing something I don't do very often...a jewelry project. It's made with a precious fingerprint.
 Please head over to Megan's blog, Our Pinteresting Family and check it out! I'll make it easy for you....just click HERE.

Sunday, November 10, 2013
SOME THANKSGIVINGNESS
Although my Halloween decor can get a little crazy and over-the-top, Thanksgiving in my home is more subdued.

 I love my pilgrims. They have such sweet faces and they are not all funked out in crazy hats with buckles. They were a gift from my sainted Mother-in-Law and I look forward to putting them out every year because they remind me of some of the fun and crazy shopping days we've had. She knows the best places to "poke around". The old crock was given to me by my awesome Father-in-Law, who remembered to ask me if I wanted it before he threw it out. Most of the time the answer to that is "yes!". It's from Whitehall Stoneware in Illinois. I love it! Thank you Charles and Virginia!
 I don't have a fireplace, so sometimes I pretend like I have a dual mantel with these shelves. I love that little garden gate and it stays around until late spring because it looks fabulous at Christmas and Valentines. This year it got a leaf garland, metal star and some mini pumpkins.
 Ever see something that was just stupid expensive and you knew it was over-priced, but you just had to have it? This little painted and glazed clay pumpkin tray was it for me. A leftover from the days when I really wanted a federal-style house. I've moved on from that plan, but I still love the tray.
 I'm all about candles, so this little pumpkin one caught my eye several years ago. I'm kind of picky about my turkeys. I just want them to look like the turkeys I see in my fields. I don't love them all bright and silly looking, although I do have one that looks a little crazy.....
 ...see him standing there on top of a pumpkin on the shelf in my entryway?
 This is pretty much what you see when you walk in my front door. That odd piece of bulbousness hanging on the wall is actually a gourd that I grew, dried out and cleaned up only slightly.
 It sits on an antique plant holder that I picked up at a fabulous store in San Diego while shopping with my Mother-in-Law. I love it when the sun catches that little prism I hung from the bottom of it.
 Since we are on the subject of gourds, here is a gourd project I made a long, long time ago, before I ever had a blog. I did it with my friend Ciree, who does not love to craft, but will indulge me occasionally. It's a beautiful reminder of a perfect fall day spent with her.
 My lanterns from Halloween stuck around for an encore, along with a picture of a pair of chickadees, some of my favorite winter birds.
 I'll say it for the hundredth time, I do not love glitter. However, a girls gotta have a little sparkle here and there, so I threw these fall colored scatter-stones underneath my nightlight. Why not?
 My friend Linda from It All Started With Paint does some awesome things with mason jars. She does so many mason jar projects, she started a second blog called........wait for it............................... ...........Mason Jar Crafts Love. When I saw this post, Thanksgiving in a Jar, it made me decide to pot up those plants that were rooting in the mason jars because I'm going to need them for this.....


 |
| Thanksgiving in a Jar |
The perfect way to send leftovers home with your guests on Thanksgiving Day!
Whether you celebrate Thanksgiving or not, I hope you have a marvelous November, with plenty to be thankful for.

Thursday, November 7, 2013
ARTISAN BREAD...EASIEST EVER! (no lie)
I had a really hard time trying to decide what to title this post. It could have been "I Didn't Sleep At All Last Night" or "The Best Blueberry Jam...Ever!" or "Two Truths and One Lie" (did you ever play that game..so fun!). But, I went with "Artisan Bread...Easiest Ever" and THAT is the first truth. It is the easiest bread I've ever made.
 I was inspired to make this bread because Karen over at The Feral Turtle made some really good-looking blueberry jam. Check it out.
Now I love blueberry jam. It's my favorite and I told Karen so and that hers looked delicious in the comments on her post. She emailed me and told me she would send me some. Was I polite and said, "Oh no! You don't have to do that!" ? NO. I replied with my home address immediately because the idea of homemade blueberry jam supersedes all pretense of politeness for me. (I did thank her profusely.)
Karen emailed me back about a week later and told me the jam was en route. I told her that I was going to make some of the "No Knead Bread" she had posted on her blog later in the week so that I could try it with her jam when it arrived. And THAT my friends is the lie. Now I didn't mean to lie. My intentions were great. But I got busy and the jam arrived and I had not made the bread.
Now let me just say, that Karen didn't just send me a small jar of jam like you see in her picture above. Oh no. She sent me a BIG jar of it as well as some very wonderful hand cream AND a bar of foot rub, all homemade and all blueberry scented! I didn't waste a second. I opened up that blueberry jam and stuck a large spoon in it and shoved it in my mouth. Heaven! Best blueberry jam EVER! And THAT is the second truth! Thank you so much Karen!
So...back to that awesomely easy bread and my lie. So that jam arrived, I needed homemade bread and I needed it STAT! I did not have the wheat bran nor the cornmeal called for in her recipe. Damn. I jumped on the computer and googled some bread recipes and found this recipe called "How to Make Easy, Fast, Foolproof Bread From Scratch". I was intrigued. This was a make-it-all-in-one-plastic-Rubbermaid-style-container, no-knead, store-it-in-the-fridge, pull-out-whatever-you-want-and throw-it-in-the-pan, artisan-style bread that goes together in 20 minutes and bakes in 30 minutes and looked too good to be true. Which meant I had to try it. I made it last night and put it in the fridge to do it's thing. Then I couldn't sleep. So, at 2 o'clock in the morning, I made a loaf of bread.
 Uh-huh! Everything this recipe claimed was true. Everything. It was the easiest bread I've ever made and there was a time when I made bread every week, because I'm not a fan of calcium propianate and you shouldn't be either. But......
 yep, there was no way I was putting that precious blueberry jam on store-bought bread. Oh, and I use real butter too!
 Did you notice my funky-looking butter container? Want to have soft, room temperature butter year-round? Get yourself a French Butter Bell.
 It's an amazing little 2 piece glass container that keeps butter on your counter fresh.
 It's so simple and yet so genius! The top half is filled with butter. The bottom has water in it. Put the top half into the bottom half and you have an instant water seal that protects your butter from air, which is what causes it to spoil. I've used one for years and have never had butter spoil. Google "Butter Bell" and you'll find them in all shapes and colors, running from $12.95 to over $40.00.
Oh, and finally, if you are still with me after this long post...I used 1/3 of the bread dough from that container in my fridge to make that loaf, which means I'll have 2 more loaves ready to bake over the next couple of weeks. The recipe says it keeps for several weeks in the fridge! Yumm. If anyone else wants to send me jam, I'm ready!
Sharing this at:


 |
| Blue Blooded Diva Blueberry Jam |
Karen emailed me back about a week later and told me the jam was en route. I told her that I was going to make some of the "No Knead Bread" she had posted on her blog later in the week so that I could try it with her jam when it arrived. And THAT my friends is the lie. Now I didn't mean to lie. My intentions were great. But I got busy and the jam arrived and I had not made the bread.
Now let me just say, that Karen didn't just send me a small jar of jam like you see in her picture above. Oh no. She sent me a BIG jar of it as well as some very wonderful hand cream AND a bar of foot rub, all homemade and all blueberry scented! I didn't waste a second. I opened up that blueberry jam and stuck a large spoon in it and shoved it in my mouth. Heaven! Best blueberry jam EVER! And THAT is the second truth! Thank you so much Karen!
So...back to that awesomely easy bread and my lie. So that jam arrived, I needed homemade bread and I needed it STAT! I did not have the wheat bran nor the cornmeal called for in her recipe. Damn. I jumped on the computer and googled some bread recipes and found this recipe called "How to Make Easy, Fast, Foolproof Bread From Scratch". I was intrigued. This was a make-it-all-in-one-plastic-Rubbermaid-style-container, no-knead, store-it-in-the-fridge, pull-out-whatever-you-want-and throw-it-in-the-pan, artisan-style bread that goes together in 20 minutes and bakes in 30 minutes and looked too good to be true. Which meant I had to try it. I made it last night and put it in the fridge to do it's thing. Then I couldn't sleep. So, at 2 o'clock in the morning, I made a loaf of bread.


Oh, and finally, if you are still with me after this long post...I used 1/3 of the bread dough from that container in my fridge to make that loaf, which means I'll have 2 more loaves ready to bake over the next couple of weeks. The recipe says it keeps for several weeks in the fridge! Yumm. If anyone else wants to send me jam, I'm ready!
Sharing this at:
Subscribe to:
Posts (Atom)